Quick Brown Rice and Feta Salad

Aside

Brown Rice and Feta Salad

Another quick post as I must admit I liked this one more than I thought I would. Isn’t this normally the way?

This started off a dinner this evening but ended up as tomorrow’s lunch. It’s a very simple salad of brown rice, feta and vegetables. It’s best served with the rice slightly warm.

  • 200g cooked brown rice
  • 1 large tomato, diced
  • 80g Feta cheese, diced
  • 1 onion finely sliced.
  • About two handfuls of mixed thinly sliced peppers (I used three whole mini versions)
  • 1 stick of celery very finely sliced
  • One carrot, grated
  • Juice of 1/2 lemon
  • 1 ‘glug’ of garlic infused oil (sorry workmates!)
  • 1 handful of chopped fresh basil leaves
  • Salt and pepper

What could be easier! Just prepare the vegetables and mix together in a bowl. I fried the onion to soften and sweeten it up first. Add the oil, lemon juice, salt and pepper (to taste) and mix well.

Curried Roast Parsnip Soup with Cumin Flavoured Croutons

20130108-200323.jpg

A quick post tonight as my team is playing!

Pescatarian January is going well – in fact today was completely meat free, fish or otherwise. As a dedicated carnivore, it felt at first like the meals I made were ‘incomplete’, like it was missing the main attraction. I’ve since found that to be nonsense of course and although I will no doubt eat meat again, I’ll certainly not see it as the be all and end all of lunch and dinner.

I made this soup over the weekend and thought I’d drop it in (mainly because since my last post I’ve made a fish wrap that should never be seen in public and pasta, the subject of that post).

Parsnips work famously with curry spices and the croutons fried in garlic oil and cumin added welcome ‘bite’. As croutons generally are supposed to do, I guess!

Serves 2 with leftovers for work

2 tbsp oil (plus more to drizzle)
4 large parsnips
1 large onion, sliced
1 garlic clove, sliced
Vegetable stock (enough to cover)
1 heaped tbsp mild curry powder
Handful fresh coriander, finely chopped
2 Tbsp single cream (optional) to finish
Salt

A chunk of stale bread, cut into 1/2 inch or 1cm cubes
1/2 tsp cumin powder
Garlic oil

Peel and half the parsnips and place on a baking tray. Drizzle with oil, a little salt, and roast for about 40 minutes until nicely browned.

Once done, remove and allow to cool.

Meanwhile, in a large pan fry the garlic and onion until soft. Stir in the curry powder for a minute or so to release the flavour.

Chop the parsnips into large cubes and add to the pan.

Pour over enough stock to cover the vegetables and gently bring to a simmer for about 20 minutes (the parsnips are already cooked).

Take it off the heat and allow to cool for a while. Then, add the chopped coriander and blend either in the pan using a stick blender or in a separate blender (in batches if necessary).

Stir though the cream and leave to gently heat whilst you make the croutons:

Simply fry the bread cubes gently in the oil and cumin powder for a minute or two until golden brown and crunchy.

Serve in bowls with the croutons on top.

20130108-231920.jpg

Homemade Pasta

Homemade pasta

I can’t tell you the tantrums I’ve thrown making my own pasta over the years. I just could not get it to work. I used a pasta machine, but the strands always stuck back together in a clump, or when I did get them as far as the pan, it turned out blubbery and unappealing.

Then there is the mess of course. I’m not the tidiest cook I admit, but the kitchen looked a disaster zone and after getting such disappointing results, I wasn’t sure it was worth it. I’m also a fan of dry pasta, being much better for the types of dishes I prefer (tomato or oil based). I gave it another go though, being a little more experienced (read: older) these days.

In theory, it’s simple of course being a mixture of flour and water, or eggs. I went for a fresh egg pasta style based on Jamie Oliver’s recipe which basically comprises 600g ’00’ flour and 6 beaten eggs. I basically reduced the amounts down to 200g flour and 2 eggs for two servings. Very generous servings in fact.

The difference I found this time though was in kneading it thoroughly – at least 5 minutes before leaving to rest in the fridge. The result was drier, much easier to cut and more importantly, much better to eat with a definite bite. It was a bit paler than convention dictates but then this is down to the colour of the eggs themselves. Next time, I’m going to try using just yolks to improve this though.

Veggie January has relaxed a bit to include fish, I just couldn’t do without. So I made a quick (low fat) creme fraiche based sauce with smoked salmon to go with it and it actually worked very well! I confess to using a small knob of butter though, essentially adding the fat that was removed from the creme fraiche, but it was a little bit ‘sharp’ and was better for it. Unlike my waistline….

Ingredients:

Pasta

  • 200g (just under a cup) ’00’ grade flour
  • 2 eggs beaten

Smoked salmon and creme fraiche sauce.

  • 2 tsp rapeseed oil
  • 1 tbsp whole capers, then chopped.
  • 150g smoked salmon
  • splash of white wine
  • 3 heaped tbsp creme fraiche (I used low fat but…..)
  • 1 small knob of butter – very much optional!
  • Salt (if needed) and black pepper.

;

Making the pasta

I used a small food processor for speed. Simplicity itself really, just blitz the eggs and flour together until you get ‘crumbs’. Then take it out and bind it together with your hands into a ball.

Then the hard bit – knead it! Five minutes minimum, but you do notice when it’s ready, becoming very smooth and pliable. Wrap it thoroughly in cling film and leave it in the fridge for 30 minutes at least.

Put a large pan of salted water on to boil now as it may take a while.

I used a pasta machine to roll it out, starting at the widest setting and finishing a number 2. To make it more manageable, I split the dough in two. Use a little flour to prevent the sheets sticking.

Rolling pasta

After the first roll, it’ll be a long oval shape, so just fold it up, like you would a tea towel and put it back through. It’s tricky but practise makes perfect I’m guessing.

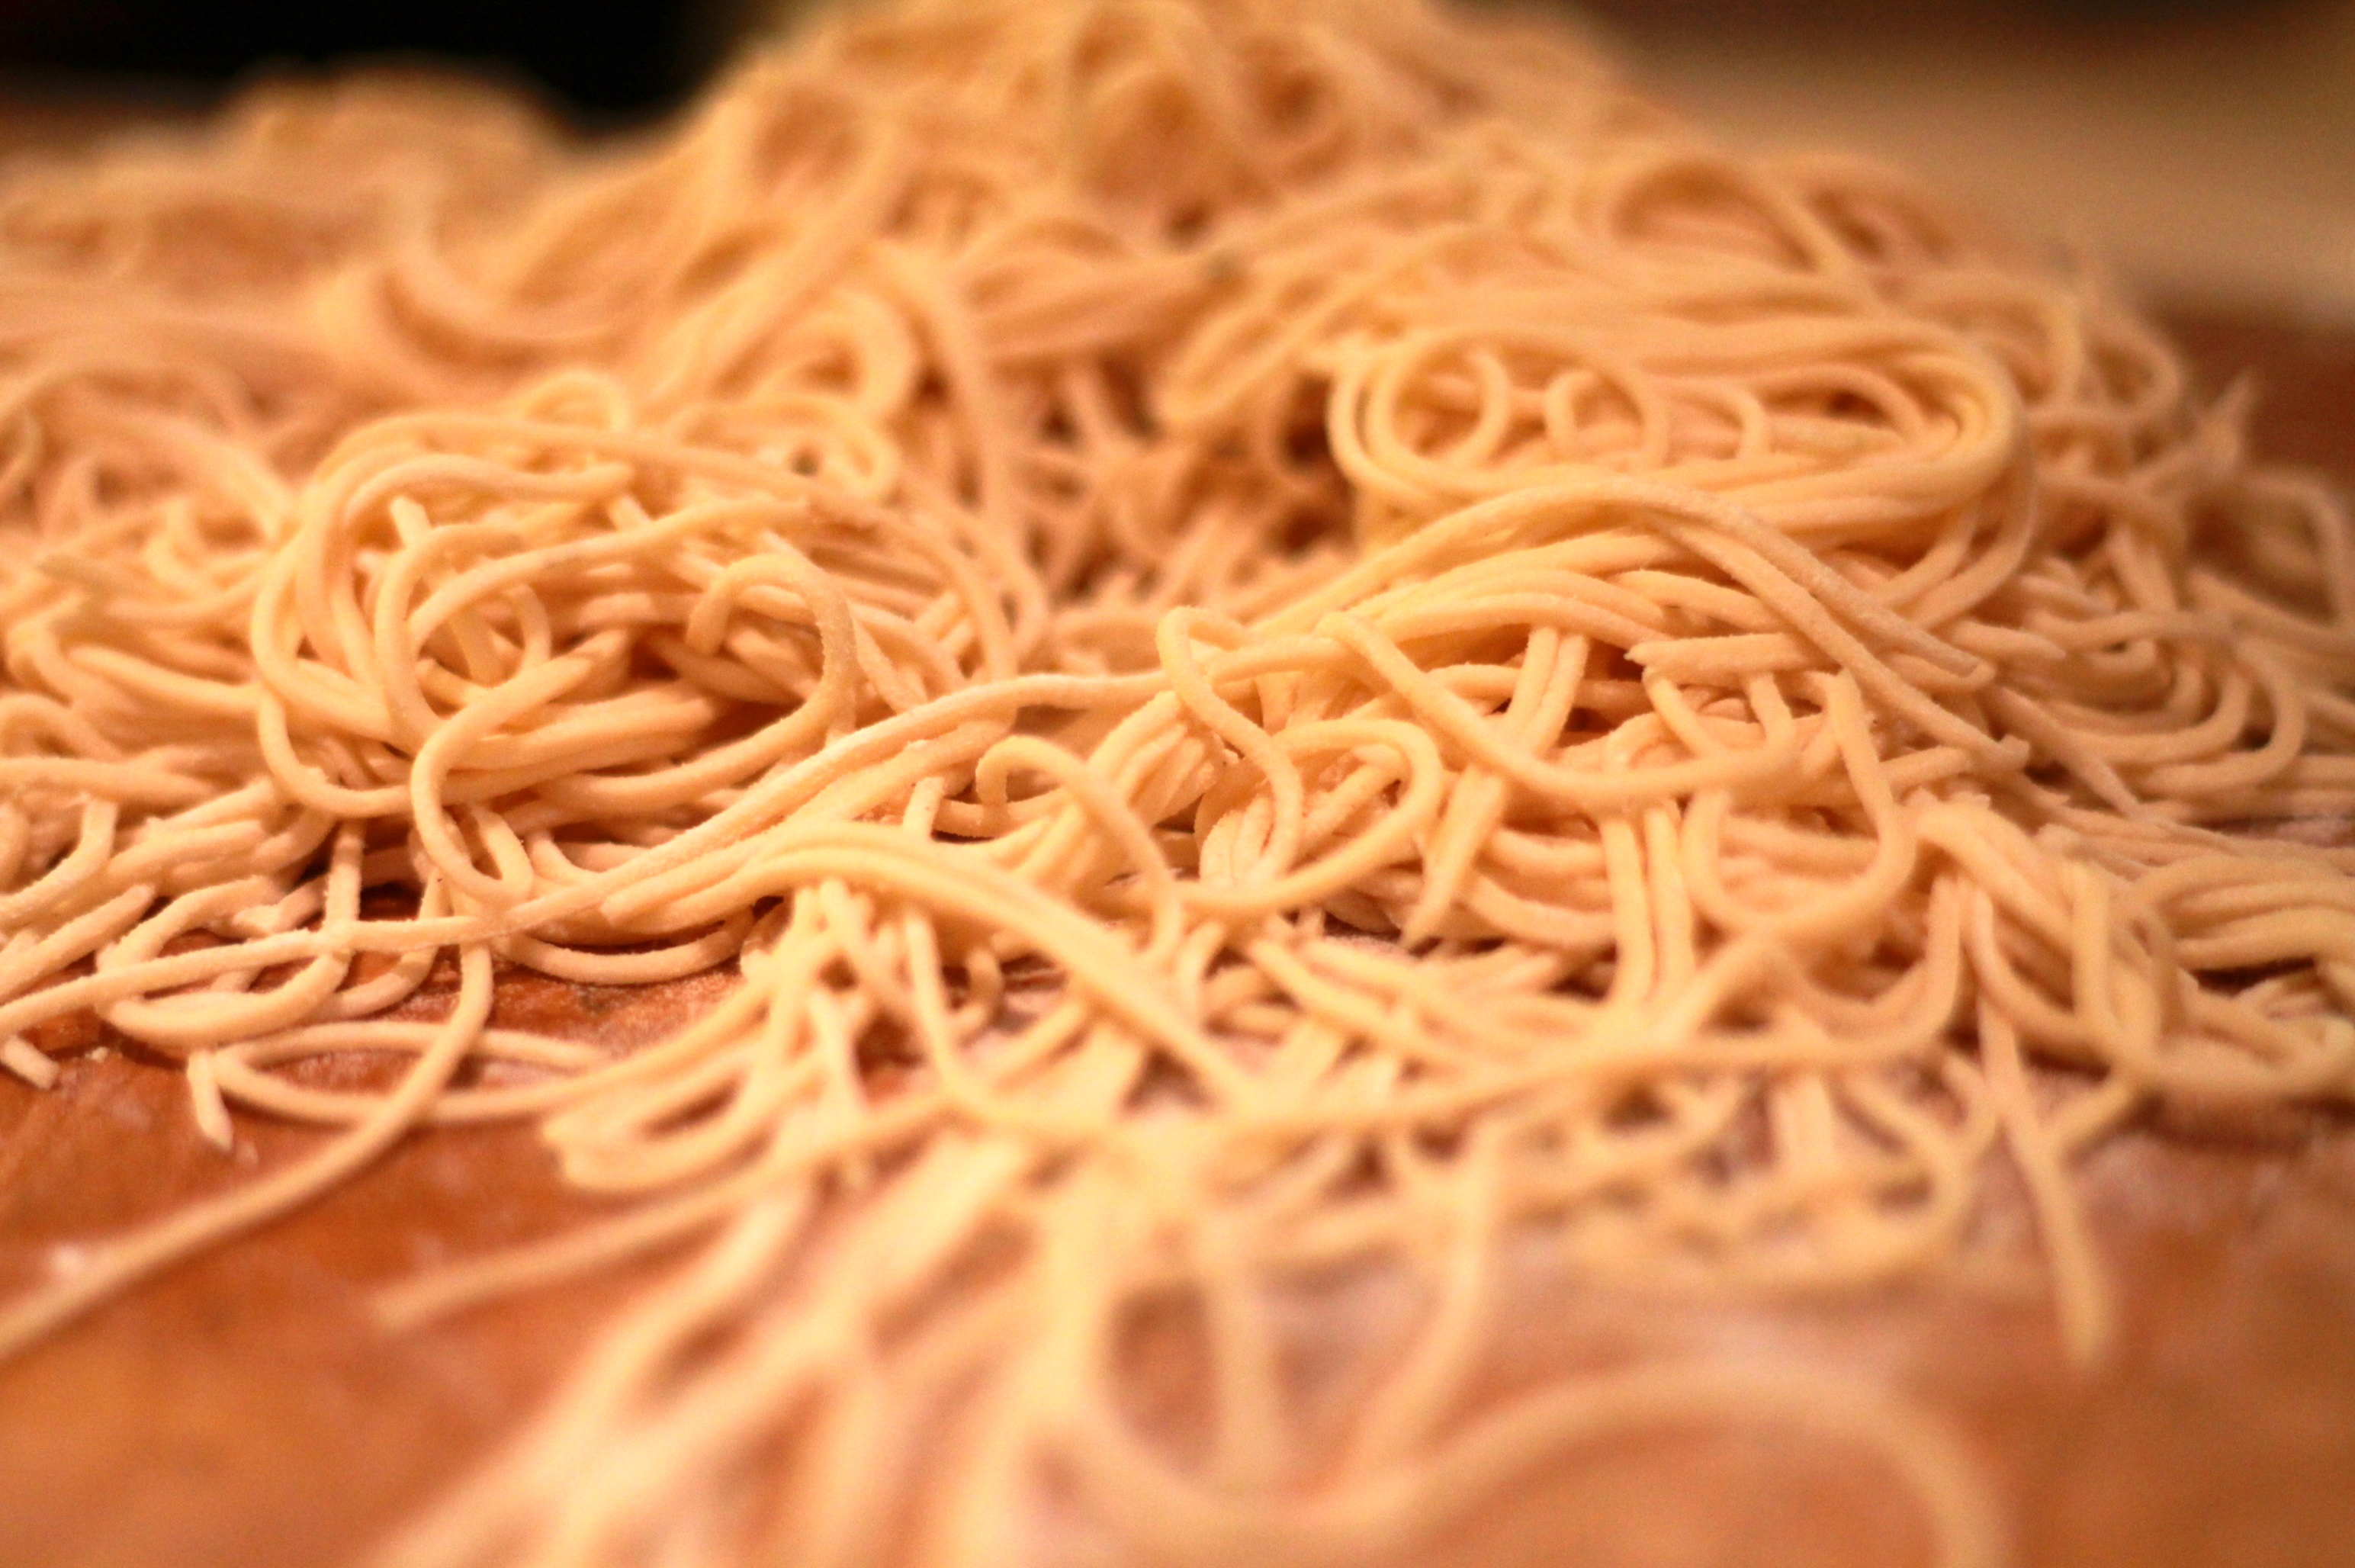
Finally, I used the smaller cutter on the pasta machine to make spaghetti sized strands. Technically I believe its spaghetti alla chitarra (thank you Wiki), being square rather than round, but after cooking you can’t really tell.

Cutting pasta

At this point I recommend you make the sauce, as the pasta cooks in a couple of minutes:

Simply fry the smoked salmon and capers in the oil in a small sauce pan for a minute then add a splash of wine. Reduce it for a couple more minutes and stir in the creme fraiche. Heat through and season with black pepper and salt if it needs it – the smoked salmon was salty enough for me. Stir in the butter if you want to ;).

The water should be rapidly boiling so drop the pasta in, separating it with your fingers as you do. Stir well with a spaghetti spoon to ensure they stay separate. It’ll only take a couple of minutes to cook and slightly underdone is much better than well overdone so you need to keep attentive.

Once done, drain it and return to the pan. Stir in the sauce and mix well with the spaghetti spoon.

Sphaghetti with smoked salmon and creme fraiche

;

Sarah’s Homecured Bacon

Our good friend Sarah visited us over Christmas and came armed with all sorts of great stuff to eat, including her latest batch of homemade bacon.

Now, in an attempt to reverse the effects of the sheer volume of pork products we got through over the festive break, we’ve decided to go vegetarian for January. More on that later of course.

So, as a last hurrah to 2012, I got Sarah to send over the basic recipe she followed which is itself based on a recipe by Hugh Fearnley-Whittingstall.

The skill is to cure the meat thoroughly, but without making it too salty, which I think she achieved nicely here. So, you’re left with the satisfaction of homemade bacon without the added water and added preservatives.

There are many versions out there but the basic method followed was:

Take a suitably sized piece of belly pork with the loin still attached. Score and pierce the rind and rub in plenty of salt, paying attention to the nooks and crannies. Leave it on a rack for 24 hours with a plate underneath in a cool place (but not the fridge).

Water will be drawn out of the meat into the plate so pour it away and reapply the salt.

Repeat for about 5 days.

After that, rinse the salt off thoroughly. Sarah said she soaked the meat for a couple of hours to help keep the saltiness down. Leave to dry.

It’s then ready to slice – she has a home slicer which makes it much easier! Of course there are other cures with ketchup, brown sugar, berries etc to experiment with.

Image

Game Pie

Game Pie

To those reading this, I hope you had and continue to have, a very pleasant Christmas! I most certainly did having spent most of Christmas Eve and Christmas Day, cooking, drinking and eating in roughly that order. The mixture of Ale, Red Wine and Single Malt Whisky is not a combination I would recommend in fairness, but then it is the ‘most wonderful time of the year’ and was hoping for a Boxing Day hangover reprieve. Unfortunately…..no.

I got the turkey from Northumberland Poultry this year and it was as delicious as it was massive (10Kg/22lb). It was however, for all intents and purposes, just a roast and therefore I thought I’d post something I’d made a couple of days earlier.

I had this Game Pie at a pub recently where it was part of a Christmas Menu, and loved it so I thought I’d try it out having never made one before for some strange reason. The wine is important here so use one you’re happy to drink. I used a Shiraz wine which is suited to game meat – some to cook with and some to enjoy with the results! The meat a pre-prepared diced mix from a supermarket, which wasn’t ideal, but never the less turned out nicely. It was a mixture of pheasant, mallard, partridge and, I think, pigeon. I added a couple of chicken thighs too as I needed to make it go a bit further.

I used a shop bought roll of puff pastry for the top though – I’m not a masochist ;). I do confess this may upset one of my friends who will insist this is not a pie, but a ‘stew with a hat’, but I hate to say I prefer this way sometimes as I’m not always in the mood to too much pastry. Also, and admittedly it’s a hollow gesture this time of year, it’s also slightly healthier of course!

We ate this on its own although a sweet potato mash would have been very good on the side we thought.

Serves 2-4 depending on how hungry you are, and takes 4 hours to 24 hours, depending on how long you have.

Ingredients:

  • About 500g of diced mixed game meat (I had 350g and made up the rest with chicken)
  • a handful of lardons or sliced bacon (about 4 slices)
  • 2 tbsp oil
  • a knob of butter (it was Christmas)
  • 1 medium carrot, sliced
  • 1 large celery stick, thinly sliced
  • 1 clove of garlic, finely sliced
  • 1 onion finely sliced
  • About 10 juniper berries
  • 300ml Shiraz wine (or any decent strong and ‘fruity’ red)
  • 200ml chicken stock
  • 1 boquet garni of thyme and rosemary
  • 2 tsp cornflour mixed with a little water
  • I ‘squirt’/tbsp of tomato puree
  • Salt and black pepper
  • 1 340g sheet of pre rolled puff pastry, or the same amount rolled 1/2 cm or 1/5 inch thick if in a block
  • 1 egg, beaten

Start by frying off the meat/bacon in the oil in a hot pan until well browned. Add the butter once nearly done (so as not to burn it) and reduce the heat a bit. Stir in the onions and garlic and soften for a few minutes at the lower heat with a good pinch of salt. Finally add the rest of the vegetables/berries followed by the wine, stock and tomato puree.

Add a generous twist of black pepper, but the bouquet garni on top, and gently simmer with the lid on for about 2 hours. The cooking liquid should be reduced, but stir in the the cornflour mixture at the end to thicken (if necessary). Taste and season if necessary.

Game Pie Mixture

Pour the mixture into a pie dish bearing in mind that the mixture needs to leave small gap at the top to accommodate the pastry. Allow to cool/rest preferably covered and left ovenight as it will be tastier the next day like any stew. I couldn’t wait that long though!

Once ready, preheat the oven to 190°c/370°f/Gas 5. Cover the dish with the puff pastry and use a knife to trim off the excess neatly. Use a fork to seal the pastry against the sides and a sharp knife to score (but not cut through) it in a criss-cross fashion.

IMG_5316

Paint the beaten egg on the top of the pastry with a pastry brush and place it in the oven for around 30-40 minutes until risen and browned all over.

Helen’s Florentines

Sorry it’s taken a while to getting round to posting this, but I wanted to put Helen’s Florentines on here. They always taste great, and that’s coming from someone who does’t have a particularly sweet tooth. For some reason they always remind me of Christmas, I don’t know why particularly, maybe it’s the colours of the glacé fruits she uses.

They were made as a ‘secret Santa’ gift and from what I gather they were well received, and rightly so as I love them. So I present, via Nigella’s Domestic Goddess cookbook, Helen’s Florentines:

Florentines

Ingredients:

  • 100g sliced almonds
  • 150g mixed glaced fruit and candied peel, chopped
  • 25g butter (unsalted)
  • 90g brown sugar
  • 15g plain flour
  • 150ml double cream
  • 200g belgian milk chocolate (to dip in)

Get the oven on and set it to180°C/350°F/Gask 5.

Start by melting the sugar and butter together in a pan and then mix in the flour to make a ball, it should be very smooth so mix it well. Add the double cream and again, mix well to remove any lumps.

Mix in the fruit and nuts and stir to combine it all.

Line a baking tray or two (depending on how big it is) with greaseproof paper or silicon sheets. Spoon a tablespoon full of the mixture onto the paper – don’t worry about it forming a ‘mound’ it will melt and spread in the oven. Add another far enough away from the first bearing in mind it will spread out. Repeat using all the mixture up.

Florentines before baking

Bake in the oven for about 10 minutes, until the edges begin to brown.

Remove from the oven and leave to cool thoroughly, on a rack preferably  (but leave them to cool on the baking tray slightly first or they be to difficult to move). Whilst cooling, put the kettle on to boil some water….

Melt the chocolate by either a) melting it in a glass bowl sat over (not touching) a pan of simmering water, or b) microwaving it gently.

Helen only covers half of the Florentine in chocolate as it’s easier to hold that way and you don’t end up with it on your fingers – just either dip it in the chocolate or paint it on using the back of a spoon or pastry brush.

Leave them to cool on a rack again.

IMG_5183

Sprout Croquettes

Sprout croquette

I must admit, and maybe it comes as no surprise considering I write a food blog, I’ll eat pretty much anything. Except tinned tuna of course; quite how anyone can is beyond me. Other than that though, pretty much anything.

Sprouts are pretty close to dropping off that list mind you and sit somewhere in the ‘tolerable’ category for me. Maybe it’s a childhood thing, or the fact they taste how they smell, a pungent cabbagey flavour. I love cabbage mind you, so I suppose I’m actually none the wiser.

Anyway, with Christmas day rapidly approaching, I thought I’d look at a few alternative methods of cooking them. Stir-frying them with bacon and/or chestnuts was the alternative last year and worked well enough, but then it hit me.

Deep frying, the last resort of the health conscious – surely this is a method that cant fail? It got me thinking and I came up with a kind of croquette. I quickly Googled the idea, and found I was far from the only one who’d come up with this sadly, but still. The beauty of this of course is that you can add flavours however you fancy. I added some potato to keep the thing bound together and the result was very good indeed. The offensive vegetable was mellowed and I actually found myself eating two or three of these. So, I though I’d share it with you.

To save time on the day, I think I might make the potato mixture the day before and cover it. It’ll just be case of skipping to the end then…

Makes 4 golf ball sized croquettes, just multiply them up as many as you need.

Ingredients:

  • 6 sprouts, thinly sliced.
  • 1 medium potato (any mashing variety), quartered.
  • 2 pieces of streaky bacon, chopped – leave it out for a vegetarian version, or replace with goats cheese.
  • A couple of springs of thyme, leaves only
  • Salt and Pepper
  • Breadcrumbs
  • One egg, beaten

Simply peel, quarter and boil the potato until cooked in a small pan. Strain it out of the water with a slotted spoon, roughly mash and set aside.

Blanch the sliced sprouts in the same water for a few minutes until softened. Don’t overdo it or they’ll be too soggy.

In a small frying pan, quickly cook the bacon, if using. It’ll only take a minute or two.

Mix the potato, sprouts, bacon (or goats cheese), a little salt, pepper, thyme and allow to cool. If this is for the next day, cover and put in the fridge at this point.

Sprout croquette

To prepare to fry them, heat the deep fryer, or just use the frying pan with plenty of oil. Whilst heating, crack the egg into a bowl and beat thoroughly. In a second bowl, pour in the breadcrumbs.

Roll and shape the mixture into golfball sized pieces. Cover in the egg, removing any excess, then roll in the breadcrumbs until well covered.

Fry gently at about 150°C or 300°F for a few minutes until nicely brown. They can keep in the oven until you’re ready to plate up, but try and do them at the end of cooking to stop them going soft. Enjoyable sprouts – a minor miracle!

Slow Braised Thai Pork

Braised pork thai broth

And so here it is, the last week of work ahead of Christmas. Helen is busy away in the kitchen making Florentines (more on that tomorrow…) and so I thought I’d post this dish I made a little earlier in the week.

The idea for this came from a comment I made a few weeks back with a fellow blogger and was itself inspired by a dish I once had. A couple of years ago, on a trip to Vegas, we threw caution, and a sizeable wad of cash to the wind and tried Joel Robuchon’s restaurant ‘Robuchon’ in the MGM. It was the one and (most likely) only time I’ve tried a 3 Michelin starred restaurant and with it being in the same hotel as we were staying, and my birthday, couldn’t pass up the opportunity. Luckily, I did OK at Blackjack that week. Phew.

I’ll be honest, I felt a little fraudulent eating there, especially with the man himself sat at the table behind us. The service though. Wow. We were held up on arrival as our table was still occupied. It wasn’t a problem, we were just enjoying ‘being there’ and having a drink in the lounge area, but they comped us his signature dish by means of an apology regardless. A lobster ravioli in foie gras sauce by the way, and it was amazing.

Anyway highlight for me was a dish of far more modest means – a slow braised beef cheeks in a thai broth. The flavours were fantastic and so strong. I’m suprised it took me so long to get round to attempting to recreate it. I couldn’t get beef, so I used pork cheeks and by poaching it in a thai flavoured stock for a few hours, it becomes beautifully tender and full of flavour. I added some enoki mushrooms and red peppers at the end to make it a bit more substantial and served it up with plain Jasmine rice.

I must admit, whilst I doubt it came anywhere near the dish I had that evening, I was very pleased with the outcome and will be definitely doing it again.

Serves 2. Takes – all day if you can!

Ingredients:

To poach:

  • 400g pork cheeks (about 4 large pieces)
  • 1 tbsp oil
  • 1 inch by 1 inch piece of ginger, sliced
  • 1 red chilli, finely chopped
  • 4 garlic cloves, thinly sliced
  • 4 shallots, thinly sliced
  • 1 litre chicken stock.
  • 2 tbsp fish sauce
  • 1 tbsp tamarind paste
  • Juice of 1 lime
  • 2 pieces of lemongrass – bashed with a rolling pin
  • 2 tbsp soft brown sugar (I didn’t have any palm sugar 😦 )

To finish:

  • two handfuls of enoki mushrooms
  • 1 red pepper finely sliced
  • 1 large handful of coriander finely chopped, stalks and leaves
  • 3 or 4 basil leaves, shredded.

Heat the oven to 130°C (fan), gas mark 1

Take a large casserole pot and start by well browning the pork in the oil on the hob. Add the chilli and garlic for a few minutes then the stock. Deglaze the pan and bring to a gentle simmer. Add the rest of the ingredients, stir well, put the lid on the pot and slow braise for 4 hours.

After that time, it should be amazingly tender and the stock reduced to concentrate the flavours. Strain the stock through a fine sieve, and again through a muslin cloth if you have one (but not essential). Return the pork to the pan with the stock, add the mushrooms and peppers and gently heat for a couple of minutes so as not to overcook the vegetables. Just before you serve it, stir in the coriander.

thai broth close up

Falafel and Tahini Sauce

Hi everyone. I promise I’m trying hard to get in the festive spirit at the moment, but rather than winding down for Christmas, my day job seems to be winding up!

I was hoping to post some more festive recipes and findings this week, but I’ll leave that until next. In the meantime, I decided to make some distinctly cheery falafel.

A staple in the middle east, it’s quick, easy, filling, tasty and yet healthy, a bit of a Holy Grail then. It can be as mild or spicy as you like, I like it hot, Helen likes it mild, so I made it somewhere in the middle!

I managed to get some tahini paste in town the other week (a mixture of crushed sesame seed and oil) to make a simple tahini sauce recipe that I shamelessly ‘borrowed’ from BBC Goodfood’s website. It was the first time I tried and it and it’s delicious, a really nice background flavour that I think would work in a whole range of dinners.

Falafel

Ingredients:

Falafel:

  • 400g chickpeas, or 200g dried.
  • 1 handful of parsley
  • 1 tsp ground coriander
  • 1 tsp ground cumin
  • 1 tsp sweet paprika
  • 1/2 tsp chilli powder
  • 1-2 tbsp oil
  • 1 handful of breadcrumbs
  • 1/2 and onion roughly chopped
  • Oil for frying

If using whole coriander and/or cumin seeds, dry roast them first in a frying pan and pound to a powder in a pestle and mortar. If using dried chickpeas, soak overnight and simmer beforehand for about 45 mins – 1 hour until cooked. Let them go cold.

To make the falafel, simply – chuck everything into a food processor and blitz until a smooth but thick (shapeable) paste.

Divide the mixture evenly, either lots of small falafels, or a few larger ones as you prefer. Roll then into balls and flatten slightly. Preferably then leave in the fridge for about 30 minutes to firm up, but I often just get them straight in the pan…

Heat a pan big enough to hold the falafel without being too big (or you’ll need too much oil) and fry on both sides until crispy and brown. About 5 minutes in total should do it.

In the meantime, you can make the sauce by mixing 5 tbsp of yoghurt with a heaped tsp of tahini, a good pinch of salt, chilli powder and juice of half a lime. Taste it and adjust it as you see fit.

That’s it! Simply serve it up on flat bread or pittas. We made our own bread (from 50g white/50g brown flour, 60 ml water, pich of salt, halved and rolled thinly and cooked on a hot cast iron pan), but for speed I often use shop-bought.

Tahini Sauce

Fegola with samphire, chilli and prawns

fregula samphire prawns

There’s an Italian restaurant in Newcastle called Panis Cafe; a no fuss, typically loud, always busy cafe style place near the Theatre Royal (for those that know the city). It’s one of my all time favourites, with consistently good and authentic Southern Italian dishes. I would just mention as well that the service is the fastest I’ve ever experienced, with a plate of food arriving literally minutes after ordering even when at it’s fullest. I guess years of catering for theatre goers will do that though.

It was here I first tried fregola (or fregula? – they spell it both ways on their menu). They’re small pieces of semolina pasta from Sardinia which have been toasted so they have a distinctive nutty taste. It took me a while to find it in shops but a small independent deli, appropriately named mmm sells it in a local market.

After trying a few variations, I personally think it’s best served as Panis do, with a light wine sauce with seafood, but I also used it in soups and it works well.

This was another spur of the moment type dinners. We went to see the Black Keys play last night and so needed something fast before we set off. I had some samphire in the fridge which is fairly commonly (and cheaply) available theses days and is delicious. It’s a coastal plant and therefore has a robust and salty flavour which is great with seafood, naturally.

This serves 4 and is ready as soon as the pasta is cooked, so about 15mins.

Ingredients:

  • 300g Fregola/Fregula pasta
  • 1 tbsp sea salt for the pasta water
  • Optional – vegetable bouillon powder – but make sure you add less salt to the pasta water
  • 200g large prawns roughly chopped
  • 2 tbsp olive oil
  • Quality Extra Virgin olive oil (to finish)
  • 1 large clove garlic, finely chopped
  • 1 green chilli, finely chopped
  • 2-3 good handfuls of samphire about 150g
  • 2 large tomatoes (preferably skinned), diced
  • 1 large glass of white wine
  • 1 tbsp chopped flat leaf parsley
  • 1 knob of butter (optional)
  • 1 green chilli, finely chopped
  • Black pepper

Start by getting the kettle on for the hot water (I promise I did this before reading Jamies’ 15 minute meals!!)

Whilst that’s happening, prepare all the ingredients and leave to one side on a board ready to use as it all happens quickly one the pasta is in.

Put the pasta in a large pan with the salt and stock powered if using. I’m not sure it’s authentic, but I think it adds a nice flavour! There is salt in the stock though, so adjust the amount extra you add.

Pour over the water and bring to a rapid boil. It’ll take about 10 minutes, so time to get on…

Add the olive oil to a small frying pan, heat gently and fry off the garlic and chilli for a minute with a good pinch of salt. Stir in the prawns and briefly colour followed by the wine and the tomatoes. Scatter the samphire on the top and leave to reduce for 3 or 4 minutes. The heat/steam will help cook the samphire without over doing it.

Check the fregola, it should be nearly done, without being over done. You can now finish this one of two ways!

1. Drain the fregola (reserving some of the pasta water) whilst slightly underdone, and return it to the pan with the sauce and a few table spoons of pasta water. Heat gently with the lid on to finish cooking. Stir in the butter once done.

OR

2. Once it’s ready (try it), drain it, keeping a little of the pasta water in case you need it.

Put the cooked & drained pasta back in its pan, stir in the butter if using followed by the sauce and mix thoroughly. Add a little of the pasta water if its too dry.

Either way, finish by stirring in the chopped parsley and a little ground black pepper and plate it up in pasta bowls. Drizzle over the extra virgin olive oil to taste.

I like to add a little parmesan and mop it up with some good bread too. Love it.