In the face of recent food supply chain “issues”, maybe this is the answer!

Food and Forage Hebrides

This is a post part of which has been sitting in my drafts for some time and for some reason, I only now get round to publication.  This is not least with encouragement of Phil at Food, Frankly and my promise to do so last week. Being a person of my word (most of the time), here is the second volume of the rather graphic venison butchery episode.  Be assured that this is somewhat more gentle than Volume 1: In the Flesh and covers making the most of the animal and preparing fine game stock and venison sausages.

Part of the reason I have not posted this so far is that I am not really a very good step-by-step recipe blogger, especially with images as I lack patience and photographic skills for this, and the processes involved very much need this approach.  However, if going off on random digressions are…

View original post 1,721 more words

Advertisement

Sarah’s Homecured Bacon

Our good friend Sarah visited us over Christmas and came armed with all sorts of great stuff to eat, including her latest batch of homemade bacon.

Now, in an attempt to reverse the effects of the sheer volume of pork products we got through over the festive break, we’ve decided to go vegetarian for January. More on that later of course.

So, as a last hurrah to 2012, I got Sarah to send over the basic recipe she followed which is itself based on a recipe by Hugh Fearnley-Whittingstall.

The skill is to cure the meat thoroughly, but without making it too salty, which I think she achieved nicely here. So, you’re left with the satisfaction of homemade bacon without the added water and added preservatives.

There are many versions out there but the basic method followed was:

Take a suitably sized piece of belly pork with the loin still attached. Score and pierce the rind and rub in plenty of salt, paying attention to the nooks and crannies. Leave it on a rack for 24 hours with a plate underneath in a cool place (but not the fridge).

Water will be drawn out of the meat into the plate so pour it away and reapply the salt.

Repeat for about 5 days.

After that, rinse the salt off thoroughly. Sarah said she soaked the meat for a couple of hours to help keep the saltiness down. Leave to dry.

It’s then ready to slice – she has a home slicer which makes it much easier! Of course there are other cures with ketchup, brown sugar, berries etc to experiment with.

Image

Helen’s Florentines

Sorry it’s taken a while to getting round to posting this, but I wanted to put Helen’s Florentines on here. They always taste great, and that’s coming from someone who does’t have a particularly sweet tooth. For some reason they always remind me of Christmas, I don’t know why particularly, maybe it’s the colours of the glacé fruits she uses.

They were made as a ‘secret Santa’ gift and from what I gather they were well received, and rightly so as I love them. So I present, via Nigella’s Domestic Goddess cookbook, Helen’s Florentines:

Florentines

Ingredients:

  • 100g sliced almonds
  • 150g mixed glaced fruit and candied peel, chopped
  • 25g butter (unsalted)
  • 90g brown sugar
  • 15g plain flour
  • 150ml double cream
  • 200g belgian milk chocolate (to dip in)

Get the oven on and set it to180°C/350°F/Gask 5.

Start by melting the sugar and butter together in a pan and then mix in the flour to make a ball, it should be very smooth so mix it well. Add the double cream and again, mix well to remove any lumps.

Mix in the fruit and nuts and stir to combine it all.

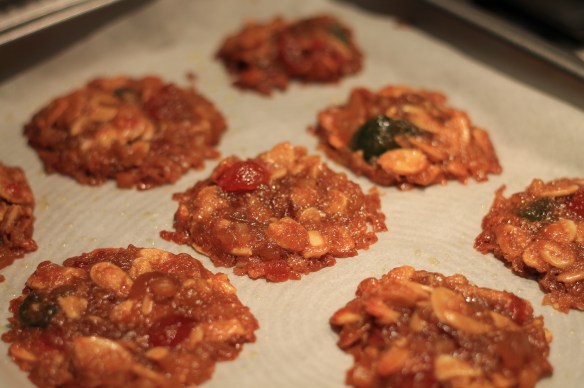
Line a baking tray or two (depending on how big it is) with greaseproof paper or silicon sheets. Spoon a tablespoon full of the mixture onto the paper – don’t worry about it forming a ‘mound’ it will melt and spread in the oven. Add another far enough away from the first bearing in mind it will spread out. Repeat using all the mixture up.

Florentines before baking

Bake in the oven for about 10 minutes, until the edges begin to brown.

Remove from the oven and leave to cool thoroughly, on a rack preferably  (but leave them to cool on the baking tray slightly first or they be to difficult to move). Whilst cooling, put the kettle on to boil some water….

Melt the chocolate by either a) melting it in a glass bowl sat over (not touching) a pan of simmering water, or b) microwaving it gently.

Helen only covers half of the Florentine in chocolate as it’s easier to hold that way and you don’t end up with it on your fingers – just either dip it in the chocolate or paint it on using the back of a spoon or pastry brush.

Leave them to cool on a rack again.

IMG_5183

Down Under

Two good friends of mine were lucky enough to spend an entire MONTH travelling across Australia recently. I asked them to send me pictures of anything interesting they sampled en route. I’ll be honest, I wasn’t sure what constitutes Australian food other than the stereotypes of barbecue, Vegemite and seafood, but that’s my ignorance. It seems, like the UK, they’ve adopted a lot of other cultural cuisines. But, from what I can see, light and fresh seems to be way of things. I guess this goes for most countries which, very much unlike the UK, are bathed in sunshine!

So, on their behalf here are some of the highlights!


Pork belly sandwich. Mouth watering and yet, literally, heart-stopping….


Gourmet crepes with kangaroo (yes, kangaroo) prosciutto, bush tomato chutney, egg cheese and baby spinach


Crushed avocado, feta and lemon juice focaccia


Mushrooms with balsamic reduction, feta and wilted spinach on sour dough bread.

Guest dessert alert!

Banoffee Pie

My mate Vic makes some great desserts. I’m not normally a pudding person, but I love this sort of thing!

Banoffee Pie is a British invention, I was surprised to find out, but less surprisingly it’s based on an American dessert. Either way it combines biscuits, toffee, banana and cream  which combine just great.

Anyway, recipe à la Vic:

For the base:

  • 100g butter, melted
  • 1 generous teaspoon of honey or golden syrup
  • 300g digestive biscuits (or hob-nobs), crushed

For the caramel:

  • 100g butter
  • 100g light Muscovado sugar
  • 1 generous teaspoon of black treacle
  • 400g can of condensed milk

For the top:

  • 4 small bananas, peeled and sliced (ripe bananas that have a few brown spots are the best)
  • 2 x 300ml cartons double cream, whipped until you can spread it with a spatula
  • Grated dark chocolate

You will also need…

20cm loose-bottomed cake tin, greased (or use a non stick tin).

Tip the crushed biscuits (Digestives work really well, but for a more crunchy, oatier base I find hob-nobs are much better) into a bowl and add the melted butter, then add the honey or golden syrup and give it a good stir. Spoon the crumbs into the base evenly then press it down firmly with a round bottomed cup or use the back of a wooden spoon. Chill for 10 minutes.

A lot of people suggest boiling the condensed milk in the can for about an hour or two, but for me this is just a faff on, and the results are more or less the same. Melt the butter and sugar into a non-stick saucepan over a low heat, stirring until the sugar has dissolved, add the treacle and continue stirring until you get a thick dark paste. Pour in the condensed milk and turn up the heat all the while stirring with a wooden spoon. As soon as the caramel starts to bubble remove from the heat and spread the caramel over the biscuit base let it cool for about 10-15 minutes.

While the base still has some heat left in it, layer the sliced banana over the caramel until it is completely covered then spoon on the whipped cream and cover the bananas. Lastly liberally sprinkle the grated chocolate over the cream.

Place in the fridge and chill for about an hour, alternatively get the forks out and scoff while it’s still warm…!